
AWS EKS
This guide describes how to deploy Runops to an EKS cluster.
Requirements
- A provisioned working EKS cluster
- A postgres RDS instance deployed in the same VPC of the cluster
- Access configure a subdomain and ACM for your runops instance, e.g.: hoop.yourdomain.tld
- An account in OKTA or Auth0
Identity Provider Configuration
To use your own Identity Provider, a new application needs to be
created in the provider. The application must be a “Regular Web App”
Application (Authorization Code flow).
Configuring Okta as Identity Provider
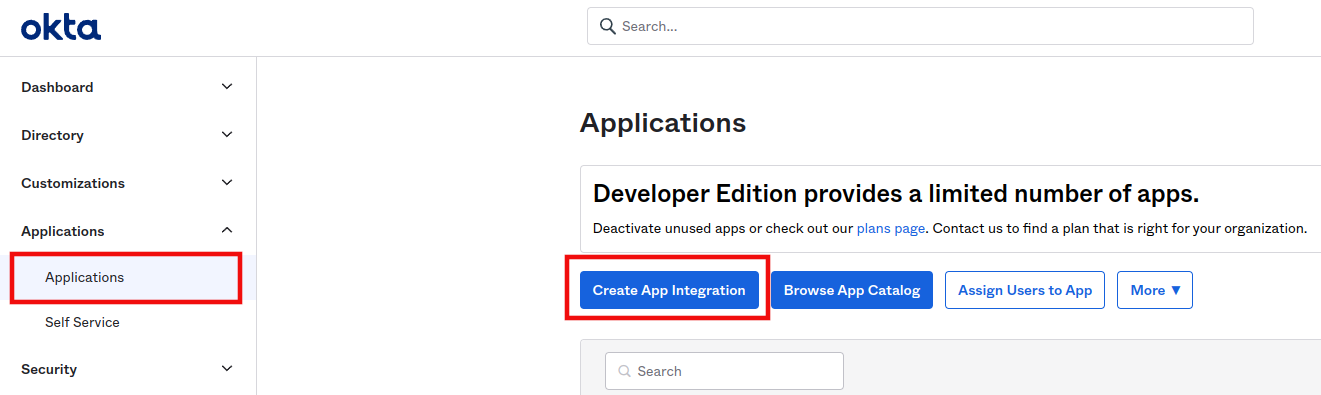
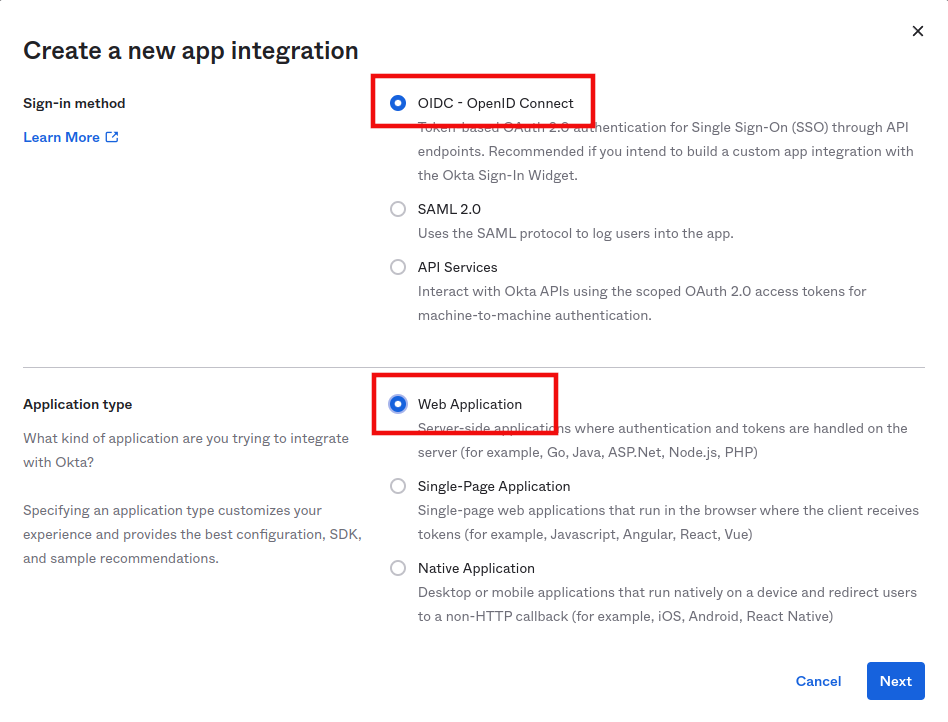
1) Create a new application
- click on the Create App Integration button:
alt text
- Signing method: OIDC - OpenID Connect
- Application Type: Web Application
alt text
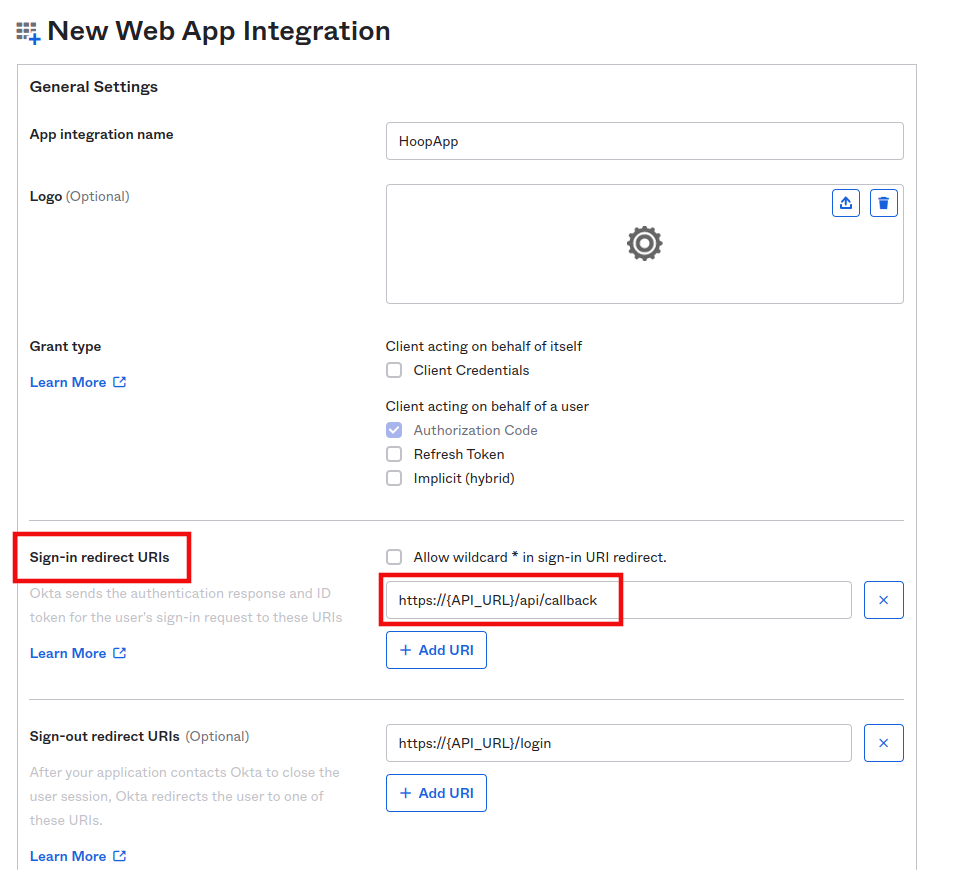
2) Configure the APP with a login callback URL
- Signin redirect URIs: https://hoop.yourdomain.tld/api/callback
alt text
:::caution WARNING You need to replace {API_URL} by your configured
domain.
Example: https://hoop.yourdomain.tld/api/callback :::
3) Save the Application
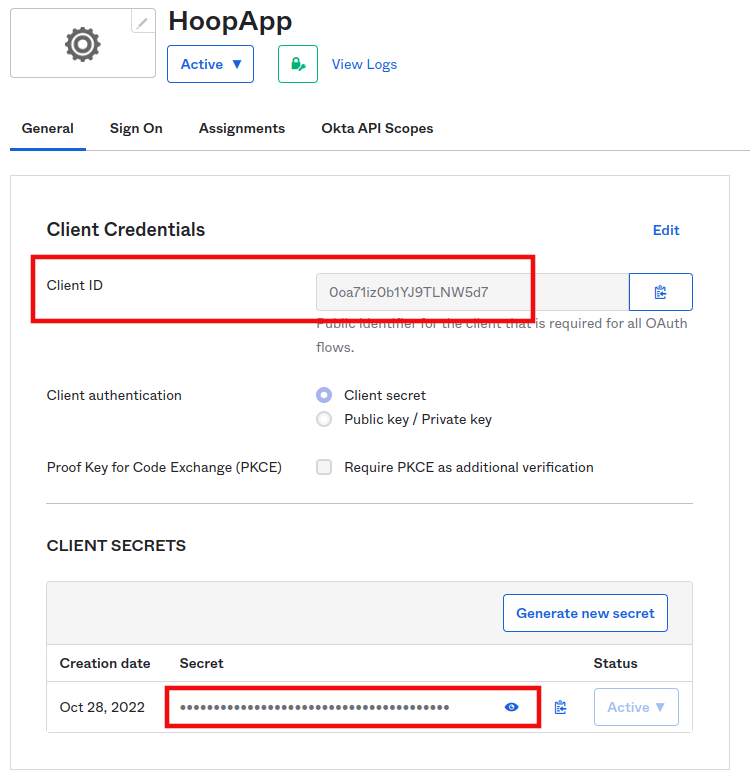
4) Collect some required information:
- IDP_ISSUER
- IDP_CLIENT_ID
- IDP_CLIENT_SECRET
- IDP_AUDIENCE
- API_URL
5) Where the data can be found:
- IDP_CLIENT_ID and IDP_CLIENT_SECRET:
On the Application Home:
alt text
- IDP_AUDIENCE and IDP_ISSUER
On Security > API
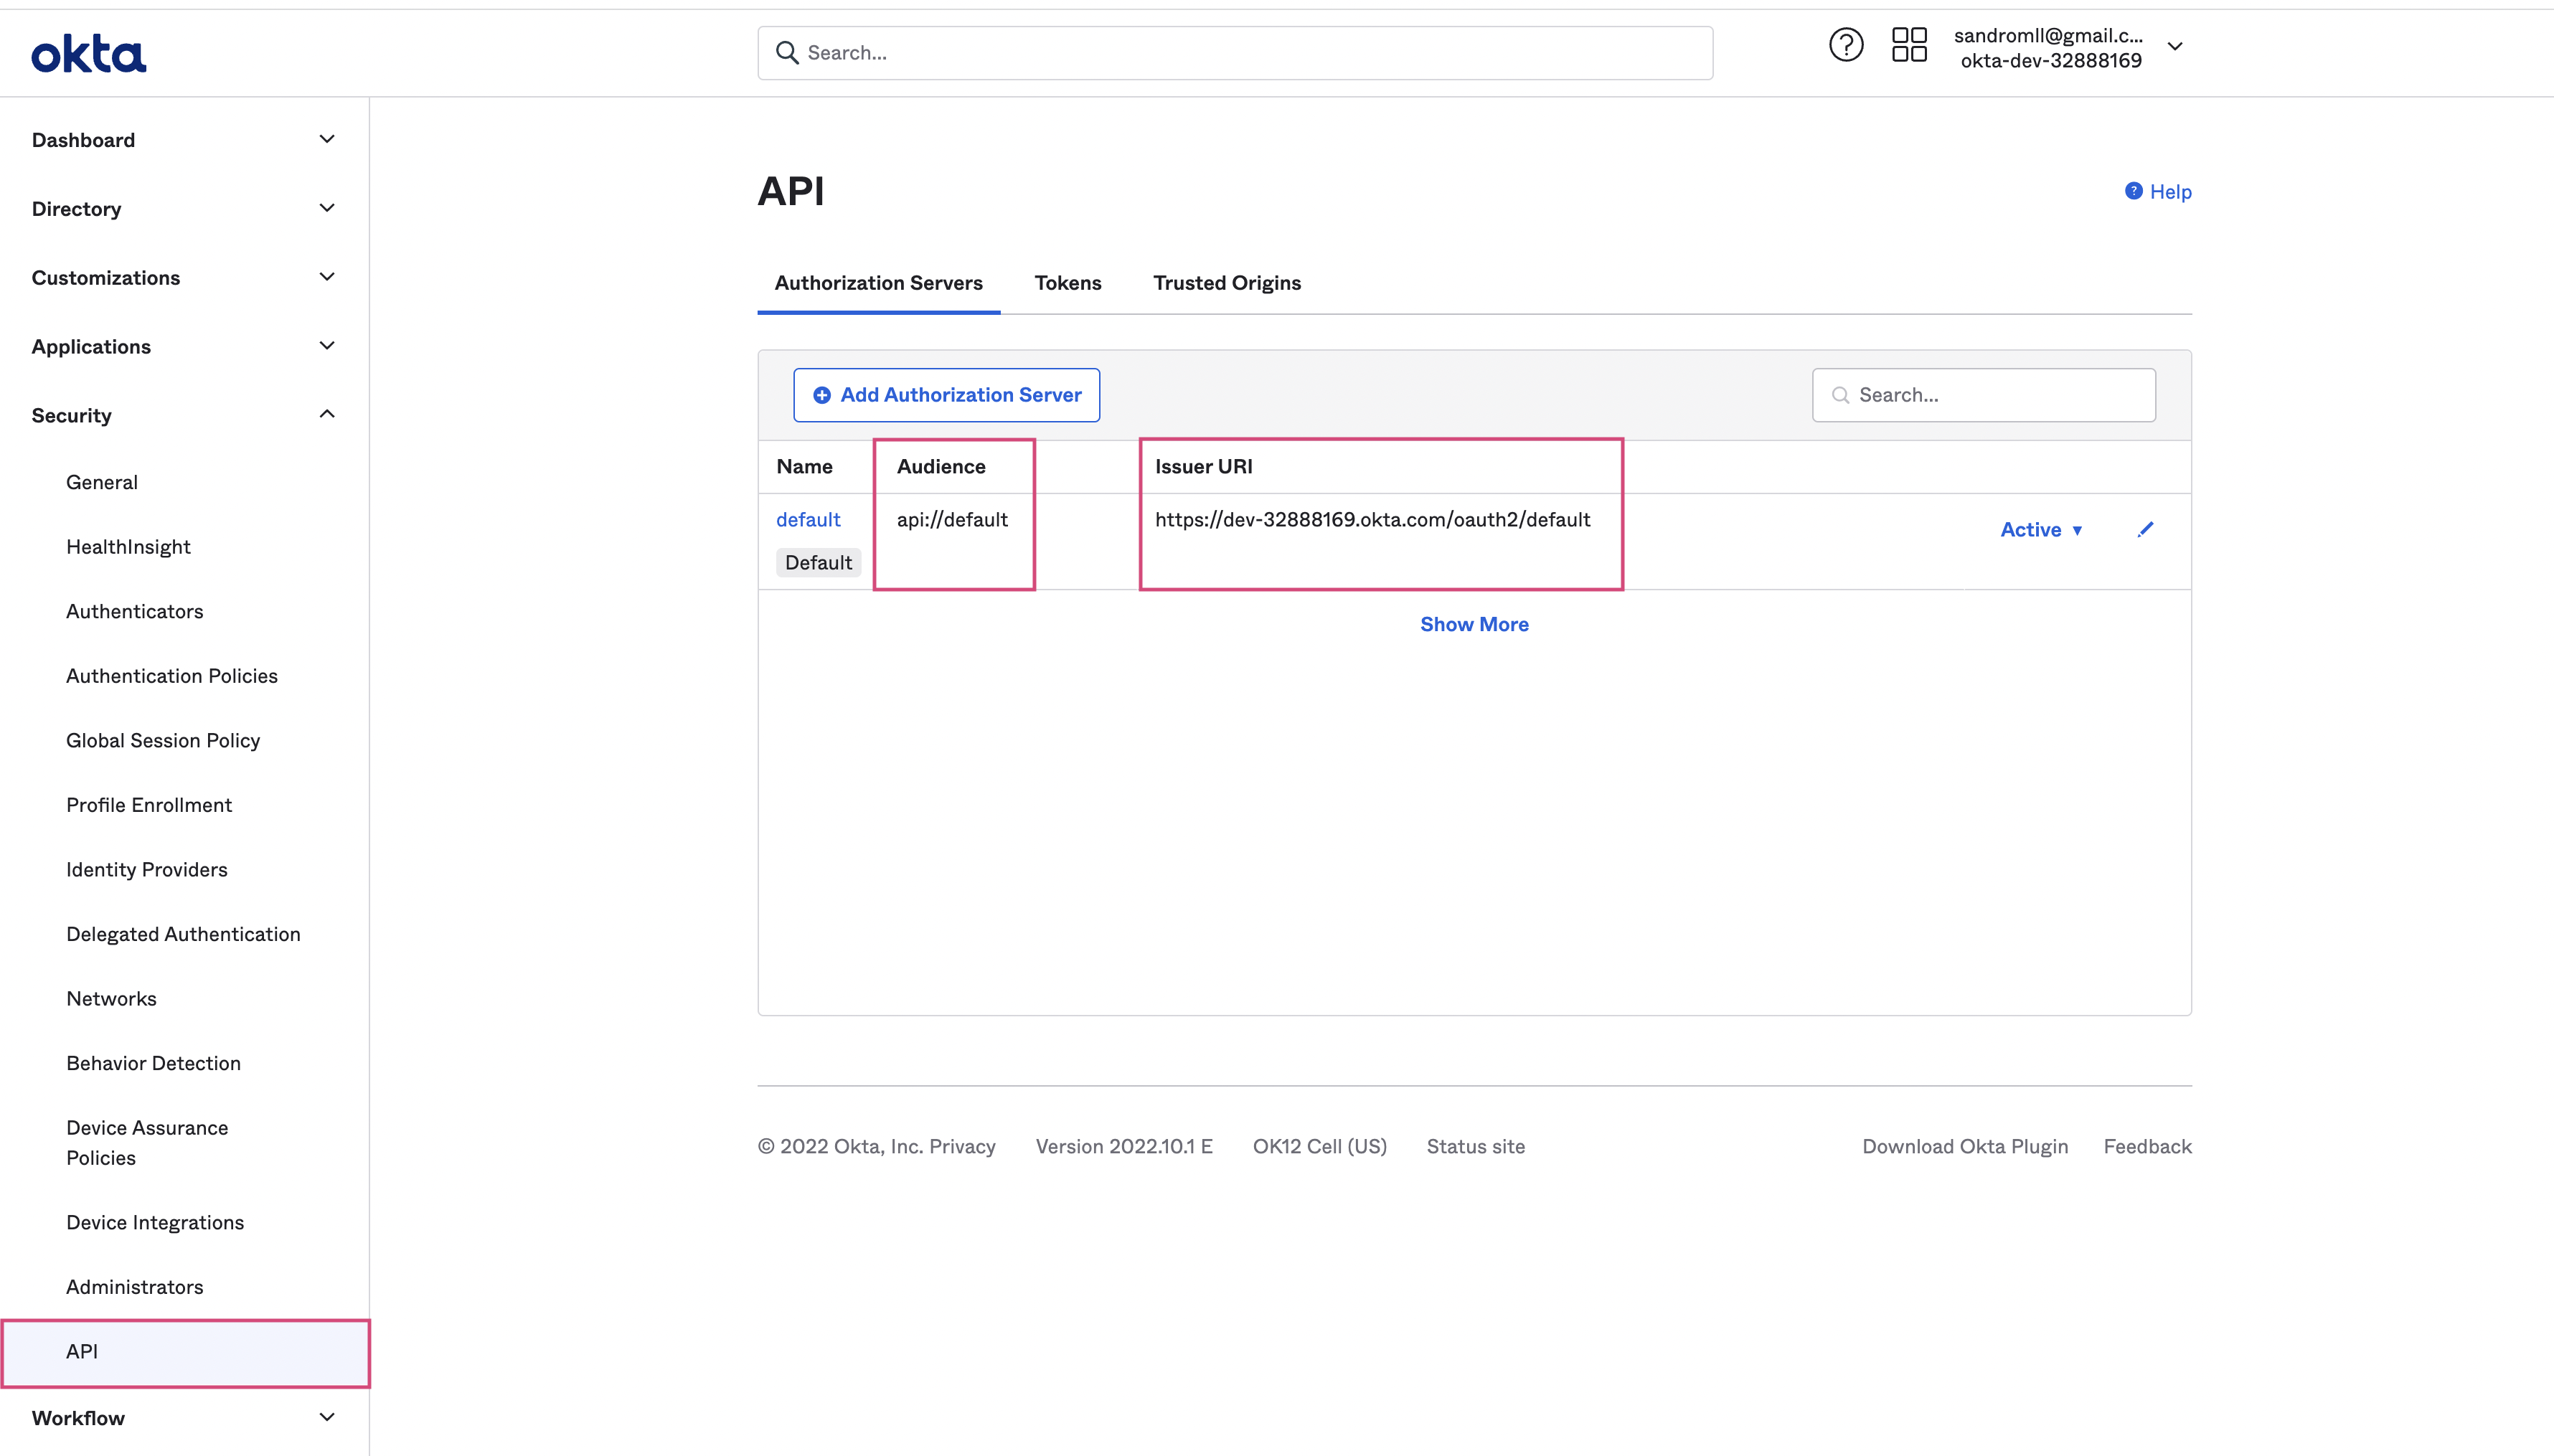
alt text
- API_URL
This is your public domain where Hoop is running in your cluster
(example
https://hoop.yourdomain.tld)1. Application Deployment
Create the following configuration as a secret in a namespace
shellNAMESPACE=hoop
kubectl create ns $NAMESPACEkubectl -n $NAMESPACE create secret generic hoop-config \  --from-literal=XTDB_ADDRESS=http://127.0.0.1:3001 \  --from-literal=IDP_ISSUER=$IDP_ISSUER \  --from-literal=IDP_CLIENT_ID=$IDP_CLIENT_ID \  --from-literal=IDP_CLIENT_SECRET=$IDP_CLIENT_SECRET \  --from-literal=IDP_AUDIENCE=$IDP_AUDIENCE \  --from-literal=API_URL=$API_URLkubectl -n $NAMESPACE create secret generic xtdb-config \  --from-literal=PG_HOST=$PG_HOST \  --from-literal=PG_PORT=$PG_PORT \  --from-literal=PG_USER=$PG_USER \  --from-literal=PG_DB=$PG_DB \  --from-literal=PG_PASSWORD=$PGPASSWORD
Deploy the application
shellkubectl -n $NAMESPACE apply -f - <<EOFkind: ServiceapiVersion: v1metadata: name: hoopdbspec: type: ExternalName externalName: $PG_HOST---apiVersion: v1kind: Servicemetadata: name: hoopgatewayspec: selector: app: hoopgateway clusterIP: None ports: - port: 8010 name: grpc protocol: TCP targetPort: 8010 - port: 8009 name: http protocol: TCP targetPort: 8009---apiVersion: apps/v1kind: Deploymentmetadata: name: hoopgatewayspec: selector: matchLabels: app: hoopgateway strategy: type: Recreate template: metadata: labels: app: hoopgateway spec: containers: - image: hoophq/hoop name: hoopgateway args: ["hoop", "start", "gateway"] envFrom: - secretRef: name: hoop-config resources: requests: cpu: 1024m memory: 1Gi volumeMounts: - mountPath: /opt/hoop/sessions name: sessions-volume ports: - containerPort: 8010 name: grpc - containerPort: 8009 name: api - image: hoophq/xtdb name: xtdb envFrom: - secretRef: name: xtdb-config resources: requests: cpu: 1024m memory: 1Gi ports: - containerPort: 3001 name: api volumes: - name: sessions-volume emptyDir: {}EOF
2. Gateway Configuration
Make sure to change the following values in the yaml:
alb.ingress.kubernetes.io/subnets
alb.ingress.kubernetes.io/security-groups
alb.ingress.kubernetes.io/certificate-arn
hoop.domain.tldto your subdomain
The security group must be allowed to accept connections from 0.0.0.0/0 in ports 8443 and 443
Reference:
https://kubernetes-sigs.github.io/aws-load-balancer-controller/v2.4/guide/ingress/annotations/
shellkubectl -n $NAMESPACE apply -f - <<EOFapiVersion: networking.k8s.io/v1beta1kind: Ingressmetadata: annotations: alb.ingress.kubernetes.io/backend-protocol-version: GRPC alb.ingress.kubernetes.io/listen-ports: '[{"HTTPS": 8443}]' alb.ingress.kubernetes.io/scheme: internet-facing alb.ingress.kubernetes.io/target-type: ip kubernetes.io/ingress.class: alb alb.ingress.kubernetes.io/group.name: 'hoop' alb.ingress.kubernetes.io/subnets: SUBNET01,SUBNET02 alb.ingress.kubernetes.io/security-groups: SG01 alb.ingress.kubernetes.io/healthcheck-path: / alb.ingress.kubernetes.io/healthcheck-protocol: HTTP alb.ingress.kubernetes.io/certificate-arn: ACM-ARN labels: app: hoopgateway-grpc name: hoopgateway-grpcspec: rules: - host: hoop.<YOURDOMAIN> http: paths: - backend: serviceName: hoopgateway servicePort: 8010---apiVersion: networking.k8s.io/v1beta1kind: Ingressmetadata: annotations: alb.ingress.kubernetes.io/listen-ports: '[{"HTTP": 80}, {"HTTPS": 443}]' alb.ingress.kubernetes.io/ssl-redirect: '443' alb.ingress.kubernetes.io/scheme: internet-facing alb.ingress.kubernetes.io/target-type: ip kubernetes.io/ingress.class: alb alb.ingress.kubernetes.io/group.name: 'hoop' alb.ingress.kubernetes.io/subnets: SUBNET01,SUBNET02 alb.ingress.kubernetes.io/security-groups: SG01 alb.ingress.kubernetes.io/healthcheck-path: / alb.ingress.kubernetes.io/healthcheck-protocol: HTTP alb.ingress.kubernetes.io/certificate-arn: ACM-ARN labels: app: hoopgateway-web name: hoopgateway-webspec: rules: - host: hoop.<YOURDOMAIN> http: paths: - backend: serviceName: hoopgateway servicePort: 8009EOF
- Go to AWS EC2 > Load Balancer and get the DNS of the load balancer.
- Add a new DNS record CNAME with name
hoop.<YOURDOMAIN>with the value of the DNS load balancer
3. Signup
Install the latest command line utility and signup
shellbrew tap hoophq/hoopcli https://github.com/hoophq/hoopcli
brew install hoop
hoop login
After that you’ll have a new organization and your user registered as
admin. You could access the webapp at
https://hoop.<YOURDOMAIN>/login4. Agents
An agent is required to connect services in your private
infra-structure. Create a new one
shellACCESS_TOKEN=$(cat ~/.hoop/config.toml |grep -i token |sed 's|"||g' |awk {'print $3'})curl https://hoop.<YOURDOMAIN>/api/agents -XPOST -d '{"name": "default"}' \ -H "Content-Type: application/json" \ -H "Authorization: Bearer $ACCESS_TOKEN"{"id":"a9fbe755-dadf-4812-8a6c-f984867055ea","token":"x-agt-3cc584be-0b5e-4722-aee9-c4b03169956f","name":"default","hostname":"","machine-id":"","kernel_version":"","status":""}
Get the
token attribute and use in the command below to
deploy a first agentshellkubectl -n hoophq create secret generic default-agent \ --from-literal=TOKEN=<x-agt-TOKEN> \ --from-literal=SERVER_ADDRESS=hoop.<YOURDOMAIN>:8443 NAMESPACE=hoop kubectl -n $NAMESPACE apply -f - <<EOFapiVersion: apps/v1kind: Deploymentmetadata: name: defaultagentspec: selector: matchLabels: app: defaultagent strategy: type: Recreate template: metadata: labels: app: defaultagent spec: containers: - image: hoophq/hoop name: defaultagent args: ["hoop", "start", "agent"] envFrom: - secretRef: name: default-agentEOF```
5. Creating a connection
- Go to
https://hoop.<YOURDOMAIN>/login
- Add a bash type connection
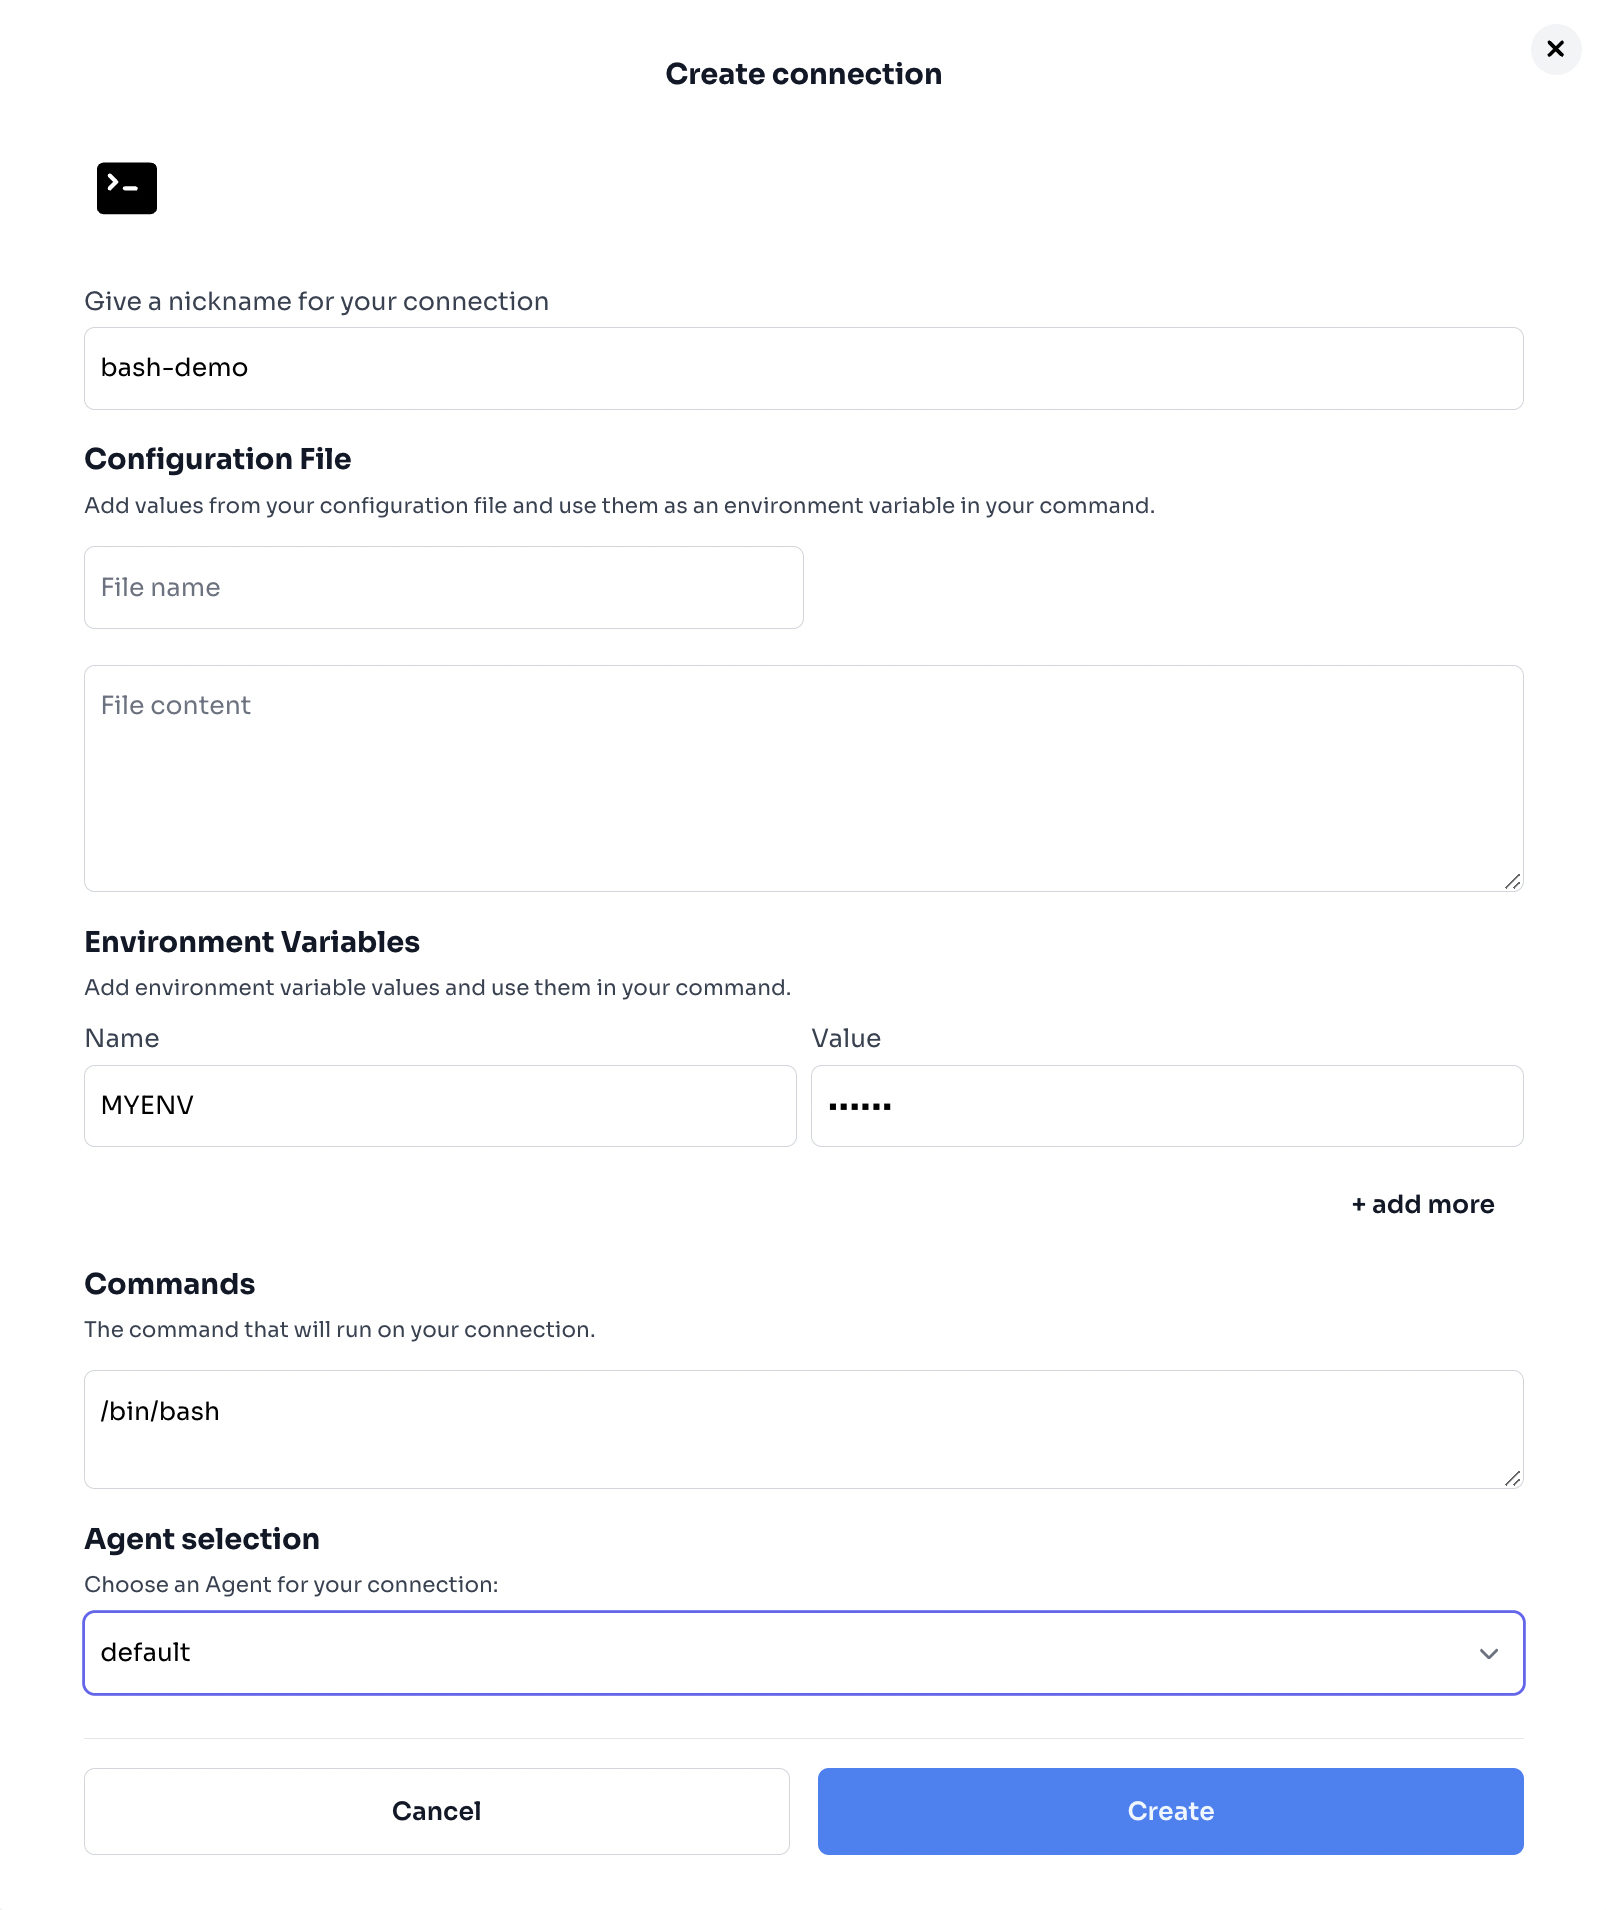
alt text
Test it
shellhoop connect bash-demo
connection: bash-demo | session: fa0206d6-57c2-483b-94d0-2627f58b5d8f
root@defaultagent-548b49654-tgg5h:/# echo $MYENVmyenv-valueroot@defaultagent-548b49654-tgg5h:/#
After closing the connection, check the audit page
https://hoop.<YOURDOMAIN>/plugins/audit, it should
contain everything you typed in the base-example connection